Pizza Recipes and Videos from Bobby Flay

Whether you’re into grilling pizza on the BBQ, or mixing Southwestern flavors into your cooking, Bobby Flay is the man for the job when it comes to crunchy crusts and spicy, unique flavors. Check out this selection of videos from the chef himself.

Grilled Pizza and Spicy Hummus

Bobby invites Iron-Woman in training Sharon Sperber to grill pizzas. Sharon loves Bobby’s Grilled Pizza with Spicy Hummus, Vegetables and Goat Cheese. Bobby is equally impressed with Sharon’s novel twist on 2 classic Italian pizzas – Margarita pizza with garam masala-spiced tomato sauce, and curried greens on a 4-cheese pie.

Shrimp and Cilantro Pesto Pizza

Bobby tours NY from Soho to Brooklyn for a taste of pizza greatness. Then he shares recipes for Grilled Lavash Pizza with Spicy Hummus, Grilled Eggplant, Feta, Red Chili Oil & Mint Red Chili-White Anchovy Caesar Salad Pizza, Caesar Salad & Grilled Shrimp & Cilantro Pesto.

Steak and Blue Cheese Pizza

Bobby invites Iron-Woman in training Sharon Sperber to grill pizzas. Sharon loves Bobby’s Grilled Pizza with Spicy Hummus, Vegetables and Goat Cheese. Bobby is equally impressed with Sharon’s novel twist on 2 classic Italian pizzas – Margarita pizza with garam masala-spiced tomato sauce, and curried greens on a 4-cheese pie.

Throwdown – Pizza Lasso NYC

Giorgio Giove is the pizza king at Brother’s Pizzeria in Staten Island. In fact, he has just come back from Italy where his special pizza won second place in the World’s Best Tasting Pizza competition. To celebrate his award-winning pies and his return from Italy, Giorgio is throwing a big family reunion. He doesn’t realize that Bobby’s been secretly brushing up on his pizza-making skills in order to crash Giorgio’s party and challenge him to a Throwdown. Bobby’s up against a seasoned pro in Giorgio, not to mention the entire Giove family, so he might have to change his whole strategy for this competition.


Throwdown – Deep Dish Pizza

Bobby visits the windy city of Chicago to challenge deep dish master Lou Malnati to a pizza throwdown for the ages.


Published in: on December 2, 2010 at 7:45 am  Leave a Comment  

Two Crusts Are Better Than One – Stuffed Spinach Pizza

There is a pizza place here in town that has always had the best stuffed pizza I’ve ever had. It’s long been my favorite slice anywhere, and yet, I’ve never even attempted a stuffed pizza! This recipe is along the same lines as my local spot – not an exact match, but it gets us moving in the right direction – and I plan on trying this out soon. As always, photos and a review will follow soon.

Let me know how it works out for you. Enjoy!

Ingredients

  • 1 (1 pound) loaf frozen bread dough, thawed
  • 1 (10 ounce) package frozen chopped spinach, thawed and squeezed dry
  • 1 cup chopped fresh mushrooms
  • 1/2 cup chopped onion
  • 1/4 teaspoon salt
  • 1/8 teaspoon pepper
  • 2 cups shredded part-skim mozzarella cheese
  • 1/2 cup pizza sauce
  • 2 tablespoons shredded Parmesan cheese

Directions

Place dough in a greased bowl, turning once to grease top. Cover and let rise in a warm place until doubled, about 1 hour. Punch dough down; divide into thirds. On a lightly floured surface, roll one portion of dough into a 10-in. circle. Transfer to a 9-in. springform pan coated with nonstick cooking spray. Press dough onto bottom and up sides of pan.

In a bowl, combine the spinach, mushrooms, onion, salt and pepper. Sprinkle half of the mozzarella cheese over crust. Cover with spinach mixture; sprinkle with remaining mozzarella. On a lightly floured surface, roll out a second portion of dough into a 10-in. circle; place over cheese layer. Pinch together top and bottom crust. (Save remaining dough for another use).

Bake at 400 degrees F for 25-30 minutes or until lightly browned. Spread pizza sauce over top crust; sprinkle with Parmesan cheese. Bake 5-6 minutes longer or until cheese is melted. Let stand for 5 minutes before cutting.

Squash Blossom Pizza Recipe from Saveur.com

Squash Blossom Pizza

I found this interesting sounding pizza recipe in an issue of Saveur magazine. Since I absolutely loved cooking with squash blossoms, I therefore absolutely love this pizza! I’ve gone through an condensed the directions as well, making sure to get rid of all instances for silliness. If you’d like to check out the original recipe/directions, check it out at Saveur.com. This recipe, inspired by Pizzeria Mozza, yields a crisp, chewy crust. See Making and Baking the Pie for a sauce recipe and more tips for making pizza.

  • 9 tbsp. extra-virgin olive oil, plus more for drizzling
  • 1 tbsp. active dry yeast
  • 1 tbsp. sugar
  • 1 tsp. kosher salt, plus more to taste
  • 6 cups flour
  • 2 cups pizza sauce
  • 60 squash blossoms, stemmed
  • 1 lb. burrata (a sort-of mozzarella that must be eaten fresh)

1. In a bowl, combine 1 tbsp. oil, yeast, sugar, salt, and 2 cups 115˚ water; let sit until foamy, 10–12 minutes. Stir in flour to make a dough. Transfer dough to a floured surface; knead until smooth, 8–10 minutes. Quarter dough; roll each portion into a ball. Put balls on a floured baking sheet. Cover with plastic wrap; let sit in a warm place until soft and tripled in size, 2–3 hours. IF you’d like to have an even tastier dough, toss the dough in sealable containers, or plastic baggies, and let sit in the fridge for a day or two. When you are ready to bake, pull the dough out two hours before you want to eat to let it come back to room temperature.

2. Place a pizza stone on a rack in lower third of oven. Heat oven to as absolutely as hot as it will go for 1 hour. Stretch dough to a 10″ diameter. Cover dough with a tea towel; let rest for 15 minutes. Brush edges with 2 tbsp. oil. Season dough with salt. Spread 1⁄2 cup pizza sauce over dough, leaving a 1″ border. Arrange 15 squash blossoms over sauce in concentric circles. Transfer pizza to stone; bake until golden brown, 3-6 minutes. Remove pizza and top with spoonfuls of burrata; drizzle with olive oil. Repeat to make 4 pizzas.

MAKES FOUR 10″ PIZZAS

Delfina's Broccoli Rabe Pizza Recipe – My Next Pizza Visit to San Francisco

Recently, Alicia and I met up with some friends on a sunny day in San Francisco and headed out to find a little neighborhood pizza joint called “Pizetta 211.” 2 hours later, and five pizzas later, we were all more than happy we had found the place and that got me thinking about other great places that were within striking distance from home that we could try. I think I’ve found our next destination, San Francisco’s own Delfina. Now I am a sucker for Broccoli in general, but broccoli pizza? You get out of here with that broccoli pizza. I love it! Below is a recipe (found in Sunset Magazine) for Delfina’s Broccoli Rabe Pizza – I’ll make sure to order one when we make the trip down and let you know if it lived up to my home version. I have a feeling it just might 🙂

-Ryan

Pizzeria Delfina’s dough, adapted for baking in a home oven, is the best we’ve ever tried―smooth and supple. The secret lies in how you stretch it. Pizzaiolo Anthony Strong demonstrates in the photos below left.

Delfina’s Broccoli Rabe Pizza
Also on MyRecipes.com

Makes: 3 (12-in.) pizzas, plus dough for 3 more pizzas Time: About 2 hours, plus rising time Note: You can use regular flour, but for a truly awesome crust, go for highprotein Italian “00” (fine-milled) flour.

Dough:

  • 1 tsp. fresh yeast
  • 1½ tsp. extra-virgin olive oil
  • 1 lb., 14 oz. (about 6 cups) “00” pizza flour, preferably Caputo*, or all-purpose flour
  • 3 tbsp. kosher salt*

Topping:

  • 10 oz. fresh mozzarella packed in liquid
  • 1/3 cup liquid from mozzarella container
  • 1/4 cup shredded caciocavallo or parmesan cheese
  • 1/4 cup each heavy cream and buttermilk
  • 1/2 tsp. kosher salt, divided
  • 1 lb. broccoli rabe (about 1 large bunch)
  • 2 garlic cloves, well smashed
  • 4 tbsp. olive oil
  • About 1/4 tsp. red chile flakes
  • Freshly ground black pepper
  • 1/3 cup oil-cured black olives (soaked in water and drained if salty), pitted and torn in half
  • Extra-virgin olive oil for drizzling

Make dough:

1. Put yeast, oil, and 2 cups plus 1 tbsp. cold tap water in bowl of a stand mixer and mix, using dough hook, on lowest speed 5 minutes, or until yeast has completely dissolved. Add flour and mix another 8 minutes.

2. Cover bowl loosely with a dampened towel and let dough rise 20 minutes.

3. Add salt and mix on low speed until incorporated and dissolved, 7 minutes.

4. Turn dough onto a lightly floured work surface and cut into 6 equal portions. Roll each into a tight ball. Place on a lightly floured tray.

5. Cover tightly with plastic wrap and let rise at least 4 hours at warm room temperature. Dough balls have risen properly when they are soft, pillowy, and full of air.

Make topping:

6. With flat side of a chef’s knife, mash a third of the mozzarella into a pulverized mass. Dice remaining mozzarella into 1/2-in. cubes. In a medium bowl, mix both mozzarellas with mozzarella liquid, shredded cheese, cream, and buttermilk. Season with 1/4 tsp. salt.

7. Cut broccoli rabe into 1-in. sections, discarding tough lower stems.

8. In a large frying pan over very low heat, cook garlic in oil, stirring often, until transparent, about 5 minutes. Add chile flakes and toast for a second, then add broccoli rabe. Stir in remaining 1/4 tsp. salt and several grinds of pepper.

9. Crank heat to medium-high and cook broccoli rabe, stirring, until liquid starts to evaporate and broccoli rabe is tendercrisp, 5 to 7 minutes.

Make pizza:

10. Heat a pizza stone or baking sheet on lowest rack of oven at 550° (or as high as oven will go), at least 30 minutes.

11. Set 1 dough ball on a well-floured pizza peel or baking sheet and stretch into an 11- to 12-in. circle (see photos above).

12. Spread about 2/3 cup cheese mixture over dough. Top with 1/2 cup broccoli rabe, a pinch of chile flakes, and 2 tbsp. olives.

13. Shove pizza onto stone. Bake 5 to 6 minutes, or until puffy and browned. Drizzle with oil. Repeat with 2 dough balls and toppings (top remaining 3 differently or freeze).

Cheese and Herb Pizza Recipe – My Favorite Pie

When Ryan asked me to collaborate on his pizza website I knew this was a great opportunity to share my trials and tribulations on pizza making. It was also a great opportunity to find that passion I once had in “Finding the Perfect Pie!”  When Ryan began his pizza quest I hopped on his pizza wheel, on the East Coast, and began my journey of tossing the perfect dough. While I haven’t gotten my recipe 100% perfect it’s pretty darn close. Recently, I had been fighting with a soggy-ish crust, which lead me to post a question on his blog.  After answering my question he then asked me to be a co-author. How exciting!

Now that pizza making is second nature to me it’s found it’s way into the weekly rotation of dinners.  It’s become a bit hum drum to say the least. When I first started out I experimented constantly with different toppings and tried recreating pizzas we had in restaurants. One in particular is from a restaurant here in NH, Nonni’s (http://www.nonnisitalianeatery.com).  Their cheese and herb pizza was unique. Sweet and salty, my two favorite combinations.  Once home, I was able to recreate the honey and roasted garlic paste used as the sauce and the rest is history.  I have never actually measured any of these ingredients.  These amounts are not exact.  You made need two heads of roasted garlic to make the sauce depending on how big your pizza is.

Cheese and Herb Pizza a la Aimee

Honey and Tyme Paste-

1 Head Roasted Garlic

1-2 Tbsp Honey

1 Tbsp Fresh Thyme

3-4 Tbsp Olive Oil

Salt to taste

Fresh Mozzarella

Preheat oven to 400.  Cut 1/3 off the top of a head of garlic to expose all the cloves.  Place on a sheet of foil. Sprinkle with 1 tsp of olive oil and a bit of salt.  Wrap the foil to around the garlic to create a pouch. Roast for 45 min. Uncover and roast for 15 min more or until the garlic is a deep golden brown.  Remove from oven and let cool.  In a small bowl squeeze out all the garlic.  Add the honey, thyme and olive oil and mix well. All the flavors should be balanced and you should be able to taste them all. Add enough olive oil to make a spreadable paste.  Add salt and pepper to taste.

On your dough spread s substantial amount of paste  add your mozz and bake until bubbly and brown.

Guy’s Crispy Deep-Fried Pizza

Guy Fieri of the Food Network brings us todays video in the form of do-it-yourself fair food: Deep-Fried Pizza! Now I know what you’re thinking, or at least I think I know, and just give it a chance. Check out this three minute video and look at what that final product looks like. It’s actually pretty tasty looking!

Enjoy!

Ingredients

  • Canola oil, for frying (amount determined by vessel used)
  • 1 recipe Perfect Pizza Dough, recipe follows
  • 2 tablespoons dried oregano
  • 2 tablespoons chopped fresh basil leaves
  • 1 cup pizza sauce
  • 2 ounces whole pepperoni
  • 4 ounces mozzarella cheese, coarsely shredded
  • 1 teaspoon water
  • 1/4 cup grated Parmesan
  • 8 fresh basil leaves, for garnish

Directions

Preheat the oil to 365 degrees F. A deep-fryer is best, but if using a stove top method, fill a cast iron Dutch oven or heavy chicken fryer with oil about 4 inches deep.

Roll dough out and cut it in half. Stir the oregano and basil into the pizza sauce. Slice the pepperoni. Spread half of the pizza sauce on half of each side, of the dough, add the cheese and pepperoni, distributing evenly. Apply a thin line of the water to the edge of the dough and fold each over onto itself and press to seal.

Check the oil temperature and carefully add the pizza pockets. Cook for 2 minutes, turn over and cook for 1 minute more. Remove to a paper towel lined plate. Transfer the pizza to serving plates and garnish with remaining pizza sauce, Parmesan and fresh basil leaves.

Perfect Pizza Dough:

  • 2 1/2 cups all-purpose flour
  • 2 tablespoons olive oil, plus more for bowl
  • 1 teaspoon sugar
  • 1 teaspoon sea salt
  • 1 tablespoon active dry yeast
  • 1 cup warm water (110 to 115 degrees F)

Combine all the dry ingredients in bowl of food processor or stand mixer. Or if by hand, combine in a medium bowl. Add the warm water to small glass bowl. Sprinkle the yeast over and let it sit for 10 to 15 minutes. Add oil and yeast mixture to dry ingredients and depending on method using, combine until a dough ball forms. For food processor, pulse on dough setting until dough is smooth and elastic. For stand mixer, slow speed until dough is smooth and elastic. For hand method, knead on lightly floured surface until smooth and elastic. Form the dough into a ball. Lightly oil a large bowl, add the dough ball to it, cover tightly with plastic wrap or a well-floured tea towel, and set in a warm place or a 100 degree F oven until doubled, about 1 hour.

Punch down, and let rest for 5 minutes. Divide the dough in half for 2 large pizzas or into 4 equal pieces for calzones or small individual pizzas. Roll the dough into 1/4-inch thick rounds. Cooks Note: Can be made ahead and also freezes well.

Yield: 2 large or 4 small pizzas or calzones

Prep Time: 10 minutes

Inactive Prep Time: 1 to 2 hours

Ease of preparation: Easy

This Curds for You – Making Fresh Mozzarella

So you know how you’ve been futzing over tiny changes in your pizza dough? Or maybe you’ve been looking for that certain something to brighten up your pizza sauce and because it might be a bit dull right now? Well forget that – you’ve stend plenty of time worrying about dough and sauce, but how many sleepless nights have you spent worrying about how fresh your cheese is?? My guess would be less than you would care to admit. Here are two mozzarella making videos that will get you started on a whole new level of “pizza obsession”… whatever that is.

Enjoy!

The Elusive Crispy Crust – Tips on Getting a Snap

Reader Aimee writes:

“So how about you tell me why my pizza won’t friggin’ get a crusty bottom!  It tends to be a wee bit on the floppy soggy side.  The top seems to cook the quickest. I tried drying my fresh mozz for a bit and using less sauce, didn’t work. Do you still use pans or do you use a stone now? I use a stone.”

Great questions Aimeee! I think this is probably a big issue for a lot of home chefs for many reasons. Let’s talk about some of them now.

  • Temperature – this is, of course, the obvious first tip to getting crispier results out of your pizza. Many recipes you see – maybe even some recipes on this very blog. Yikes! – will have you preheat the over to 400, 425, 450, something like that. ALWAYS DISREGARD this advice. Commercial pizza ovens operate in the neighborhood of 800 to 1100 degrees, so in order to get even remotely close to the pizza you know and love, you need to crank your oven up to the highest possible setting! For me, this means setting it to 550+. I saw “+” because my oven has a knob which allows me to select “bake” or “broiler” as well as a temperature dial which goes to 550 and then continues on to “broiler.” The double up in terms is a bit confusing, but I think what I’m doing what I set it to “bake” on the mode knob and “broiler” on the temperature knob, I’m asking the oven to try to keep the heating element on as long as it possibly can at the highest temp it possibly can. Goal achieved. Now, because you are running your oven hotter than before, hopefully more liquid will evaporate off your pie and out of your crust which will equal a crispier end product.
  • Preheat – Preheat your oven and let it sit at full temperature for at least 45 minutes to an hour before trying to bake in it. Especially if you are using a pizza stone, this will allow the stone to absorb all the heat it possibly can, as well as the sides of the oven, ensuring that you get the hottest bake out of your oven as possible. I know that my general theme on this blog is that time is the most secret of all ingredients and here it is again – don’t rush pizza, and as Alton Brown says, “your patience will be rewarded.”
  • Baking Stone – This is a big must for a crispy pizza crust. Again, commercial ovens have stone floors in them, not metal, so we can all take a tip from the pros and duplicate this scenario at home. Baking stones are beneficial for two main reasons:

    1) Baking stones absorb and store heat, so while your oven can only generate so much heat, the stone will store much of that heat and radiate it back out to the surrounding oven space. This will not only allow you to achieve temperature higher than what your oven would normally be capable of, but will also regulate heat loss when you open the oven to check on progress. In addition, it will also regulate how wide of a temperture swing occurs as your oven sycles the heating element on and off. Think even heat.

    2) Baking stones absorb water. They have small holes in the surface unlike metal baking pans, so they have the ability to capture and dissipate water. This is a good thing.

    The quick science behind a baking stone (or pizza stone – same thing) is as follows. The stone is both intensely hot and moderately porous. When the dough hits the stone, the water in the dough instantly wants to turn to steam and get the heck out of there, and since there are small air pockets in the stone, the steam has a space to move into. In essence, the stone both causes, and then absorbs, the steam trying to escape from the dough. Again, less moisture, more crispy. Soild petal pizza pans give the water nowhere to go, so the water is either retained in the dough, or must make its way to the surface of the pie before escaping.

  • Dry your ingredients – This may sound funny, but it really really helps out a lot. Especially when you are trying to make a pizza with a lot of fresh veggies! Vegetables and wet cheeses are notorious for releasing a ton of water once they hit the oven, so simply chop everything up before hand, lay it down on a kitchen towel, and fold the towel over so the water from the fresh cut veggies has somewhere to escape to before it hits your crust. I do this with my fresh mozzarella as well and I even take this theory a step further: One I’ve got everything sliced and drying in towels, I place the towels on top of the range where the radiant heat of the pre-heating oven moves up into the veggies and gives them a more thorough drying. Be careful with oven-drying the cheese though. I got a little careless last weekend with some cheese in a towl on the top of a hot oven and when I went to open up the towel, I found that I had glued it together very thoroughly with six dollars of nice fresh mozzarella! Never got that damn towel clean either!
  • Use less stuff – It is always tempting to over top your pizza, but here is a tip: don’t. In general, take whatever your natural instinct is for topping pizza is, and then consciously dial that bake 30%-40%. Pizza is a balancing act between bread, cheese, sauce and toppings, but zen philosophies aside, you’ll find that if you give everything a little breathing room, your cheese will stick to your crust better (no sliding off with the first bite), your pizzas will be crispier, and most importantly, you won’t be as full after eating a slice which means you can eat more! Who can argue against that??

Finally, let’s address one of Aimee’s specific problems she has had trying to combat the floppy soggy crust syndrome.

  • The top seems to cook the quickest – pay attention to how your oven cooks your pizzas and where you are putting your oven racks. If Aimee seems to always have an overcooked top, and an undercooked bottom, she should consider moving her pizza stone down to the next lowest baking rack. Even though we’re talking about the interior of a 550+ degree oven, the laws of thermodynaics still apply: heat rises. A too-quickly-cooked top means that her pizza is too high in her oven and the heat that pools at the top of it is cooking the top of the pizza faster than the bottom. To learn an oven, I would start the stone at the lowest possible rack setting, and then based on how the bottom of the crust turns out, I might move one or two spots up the next time around.

    Interesting technique: many home pizza chefs bake with their pizza stones as low in the oven as possible to get the stone as close to the heating element as possible, then, when they have checked the bottom and it is looking nice and crisp, they move the pie to their oven rack which has been positioned at the very highest spot in the oven to finish off the top. This gives you precise control over how done the bottom and top of the pie are when it finally comes out of the oven. I personally use this technique often, but if I could find that sweet spot in my oven where I didn’t need to do it, I wouldn’t

I hope this has been enlightening and helpful and I hope to see photos of reader Aimee’s improved crispy crusts real soon! Please submit any other questions you guys may have and I’ll answer as best I can. If there is any last tip I could leave you with, I would simply repeat myself in saying that time is the only secret ingredient. So many people are looking for quick eats and dinners in 30 minutes or less, but when compared to dinners that took you 3-4 days to prepare, they all start to taste like fast food!

Spend some time with your food.

Talk soon,

Ryan

Pan Pizza for People Without Pizza Pans

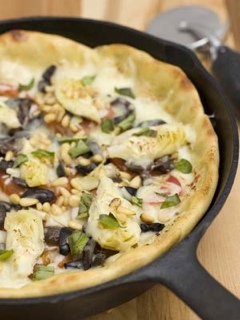
It’s beginning to get rainy here in northern california and it seems to me that a warm skillet pizza from the Whole Foods website would be the perfect match to a blustery autumn day. Here’s to cuddling up with your favorite chunk of blackened iron. Enjoy!

Makes 2 (9-inch) pizzas

Corn flour and butter make this pizza crust tender and nutty while the heat from the cast iron skillet helps make it nice and crisp. Feel free to experiment with this recipe; create your own variations using your favorite topping combinations. For a more traditional pizza, spread a cup of tomato sauce over the dough before adding the other toppings.

Ingredients

  • 1 (1/4-ounce) package active yeast
  • 1/2 teaspoon sugar
  • 1 1/4 cups warm water (about 110°F)
  • 1/4 cup (1/2 stick) unsalted butter, softened
  • 3 cups unbleached all-purpose flour
  • 1 cup corn flour
  • 2 teaspoons salt
  • 4 cloves garlic, thinly sliced
  • 1/2 cup Kalamata olives, pits removed, chopped
  • 1 cup quartered artichoke hearts
  • 4 Roma tomatoes, thinly sliced
  • 12 ounces whole milk mozzarella, shredded, or 12 ounces goat cheese, crumbled
  • 1/4 cup pine nuts
  • 2 tablespoons extra virgin olive oil, more for oiling the bowl and skillet, divided
  • 1/2 cup basil leaves, torn into pieces

Method

In the bowl of an electric mixer, combine yeast, sugar and water and let stand 5 minutes until foamy. Add butter, flour, corn flour and salt and combine well, using the paddle attachment. Knead, using a dough hook, until the dough pulls away from the sides of the bowl and crawls up the dough hook. Add 1 to 2 tablespoons water if dough is dry and not coming together. If dough is too wet, add 1 to 2 tablespoons flour. Remove the dough from the bowl. Grease the bowl with olive oil and return the dough to the bowl. Cover and let the dough rise until it doubles in bulk, about an hour. Turn the dough out onto a floured surface and divide in half. Shape the dough into two balls, cover and let rest for 15 to 20 minutes.

Preheat oven to 500°F. Oil two 9- or 10-inch cast iron skillets. Pat or roll dough into a circle and transfer it to the skillets. Press dough down into bottom of skillets and up the sides. Scatter dough with garlic, olives, artichoke hearts and tomatoes. Top with mozzarella cheese or goat cheese and pine nuts. Drizzle each pizza with a tablespoon of olive oil.

Bake on bottom rack of oven for 15 minutes. Reduce oven temperature to 400°F and bake until pizza crust is golden brown and toppings are starting to brown, 10 to 15 minutes. Remove pizza from oven and top with basil.

Note: Toppings like pepperoni should be added when the oven temperature is reduced to 400°F, otherwise they will brown too quickly.

Published in: on November 3, 2010 at 8:00 am  Leave a Comment  
Tags: , ,

Thanksgiving Pizza from… Not Martha!

This was too good to not pass on to you. It’s a Thanksgiving pizza… pie! The Not Marthas, over at wearenotmartha.com created this genius Thanksgiving invention, complete with homemade cranberry sauce, turkey, herbs, and what else, an apple pie in the middle! I personally consider it a step towards the futuristic meal-in-a-pill – just this pill is about 16″ in diameter. What can I say, they’re working on it!

Check out the Thanksgiving Pizza Pie at wearenotmartha.com.